In order to call objectiveC library from swift project, swift project needs a bridging header file to import the ObjectiveC header file, so swift code can get the functions signature defined in objectiveC library.
If swift project is already created when importing ObjectiveC, then you need manually create the bridging header file with the below steps:
1. in swift project, clicking add new file, and add a objective C coca file, for example, adding a default ViewController class
2. Xcode will show a dialog to ask you whether to create a bridging header file
3. Click Create bridging Header button to create the bridging header file
4. Once the bridge header file is created, in the swift project, delete the objective C .h and .m file by moving them to trash
5. In swift project settings general tabs' "linked Framework and Libraries" section, add the Objective C library project
6 update swift project Bridging Header file, to include the objectiveC header file. For example, if the ObjectiveC library is named as "ObjcLibrary", then add the below line
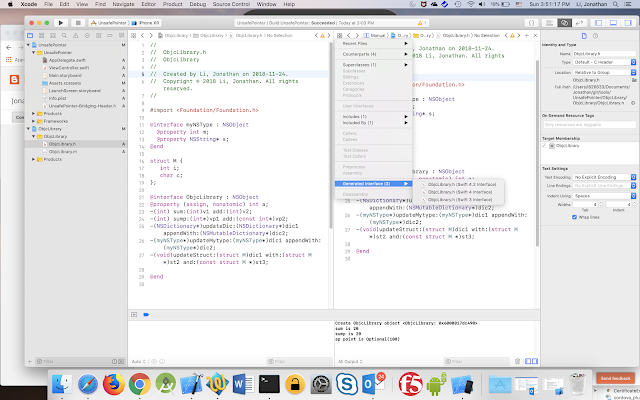
After importing the c .h file into the swift project, quite often you want to check the generated swift function signature based on c .h file. You can do so with the below steps
1. open the c version .h file
2. open the Assistant Editor window, and then open the same c version .h file in it
3. click "Related items" button, and then select "Generated Interfaces", which will allow you to choose swift version for the generated swift .h file
Now, you can compare the c .h file and the generated swift interface side by side
If swift project is already created when importing ObjectiveC, then you need manually create the bridging header file with the below steps:
1. in swift project, clicking add new file, and add a objective C coca file, for example, adding a default ViewController class
2. Xcode will show a dialog to ask you whether to create a bridging header file
3. Click Create bridging Header button to create the bridging header file
4. Once the bridge header file is created, in the swift project, delete the objective C .h and .m file by moving them to trash
5. In swift project settings general tabs' "linked Framework and Libraries" section, add the Objective C library project
6 update swift project Bridging Header file, to include the objectiveC header file. For example, if the ObjectiveC library is named as "ObjcLibrary", then add the below line
#import <ObjcLibrary/ObjcLibrary.h>
After importing the c .h file into the swift project, quite often you want to check the generated swift function signature based on c .h file. You can do so with the below steps
1. open the c version .h file
2. open the Assistant Editor window, and then open the same c version .h file in it
3. click "Related items" button, and then select "Generated Interfaces", which will allow you to choose swift version for the generated swift .h file
Now, you can compare the c .h file and the generated swift interface side by side

No comments:
Post a Comment