Monday, December 17, 2018

Avoid repeated prompt for username and password to allow keychain access on mac

Quite often Mac asks user to give permission for certain operations so the application is can access keychain items. Sometimes even if user inputs the right user name and password, user is still not able to finish the operation. The following steps can be used to avoid this

For client certificate keychain item:
1. Identify which keychain item is used by the operation,
2. open keychain app and select and right click the item, select Get Info menu item
3. open trust section, change "Use System Default" to "Always Trust"
4. save the change


For password keychain item
1. Identify which keychain item is used by the operation,
2. open keychain app and select and right click the item, select Access Control tab
3. select "allow all applications to access the item"
4. save the change


Tuesday, December 11, 2018

iOS viewcontroller completion block and retain cycle

It is well known that when referring self or instance variable inside a block, it is better to use
a __weak reference variable to avoid memory leak due to retain cycle. But this may not be necessary in all the cases, and sometimes it is better to use self instead a weak self reference.

First let see a case how retain cycle happens.
@interface RetainCycle : NSObject{
    void (^testBlock)(void);
}

@property (strong) NSString* mystr;
-(void)setup;

@end

@implementation RetainCycle
-(void)dealloc{
    NSLog(@"RetainCycle instance: %@ deallocated", self);
}

-(id)init {
    NSLog(@"Init called %@", self);
    return self;
}

-(void)setup{
    testBlock= ^{
        self.mystr = @"hi";
        NSLog(@"Integer is: %@", self.mystr);
    };
}
@end

For the above RetainCycle interface, if an app calls the below method
-(void) test {
    RetainCycle* rc = [[RetainCycle alloc] init];
    NSLog(@"RetainCycle obj: %@ created", rc);
    [rc setup];
}
then after the method returns, the RetainCycle instance will not be released. The reason is self is retained within the testBlock due to reference to self.mystr, and testBlock is retained as a property of RetainCycle.

The means retain cycle only happens, if the block is keeping retained by self or its property.

If we change the above code to the below line, then the retain cycle related memory leak will not happen

    __weak void (^testBlock)(void);


Now, we can look another popular case, where retain cycle does not happen, that is the completion block used by view controller.

@interface TestViewController : UIViewController


@end

@implementation TestViewController

-(void)dealloc{
    NSLog(@"*******TestViewController instance: %@ deallocated", self);
}


- (void)viewDidLoad {
    [super viewDidLoad];
    // Do any additional setup after loading the view from its nib.
}

- (IBAction)onDismiss:(id)sender {
    [self.presentingViewController dismissViewControllerAnimated:YES completion:^{
        NSLog(@"Test View controller dismissed %@", self);
    }];
}
@end

In this case, after creating and showing the viewcontroller, user can click the dismiss button to dismiss the view controller. Notice the dismissViewController method's completion block also refers self for NSLog output, but it would not cause memory leak due to retain cycle.

The reason is although the block retains the self for writing NSLog data. But self (viewController) only temporarily retain the block. After the viewController is dismissed, the completion block returned by view controller will be released, and so block will deallocate itself and all objects retained by itself.  So there is no need to change self to a weak reference in the completion block used by view controller. This is also indicated by the xcode debugger, which will call _Block_release after the view controller is dismissed

Actually in most case, we may want to use strong self for view controller completion block, as the operation will need the view controller alive to finish, such as read the text input from the view controller's text field.


Sunday, November 25, 2018

UnsafePointer and UnsafeMutablePointer

When calling objective c function from swift code, the objective c type needs mapping to swift type.

For primary type used as value type parameter, like int, NSString*, they can be mapped to primary type of swift, as Int32, String.

For NSObject inherited interface types, as they are always used as reference type (pointer), so they can also mapped to the corresponding swift types, or keep Objective C original type. For example, NSArray will map to [Any], NSDictionary will map to [HashTable: Any]. But NSMutableDictionary and NSMutableArray will keep the same type name in swift code.

For C struct when used as value type parameter, the same type name will be in swift code.

The thing gets complex when pointer are used for primary type and c struct.

When pointer is used, if the pointer is defined with const, which means the object pointed by the pointer cannot be changed, then the parameter type will mapped to UnsafePointer<Type>; otherwise, it will be mapped to UnsafeMutablePointer<Type>. The major difference between UnsafePointer and UnsafeMutablePointer is UnsafePointer.pointee is read-only, while UnsafeMutablePointer.pointee is writable.

Objective C

-(int) sump:(int*)vp1 add:(const int*)vp2;
maps to

func sump(_ vp1: UnsafeMutablePointer<Int32>!, add vp2:UnsafePointer<Int32>!) -> Int32


If an objective c function only takes a pointer parameter, and on swift side an swift object is passed to the function, then you can use helper method of withUnsafePointer or withUnsafeMutablePointer to simplify the logic. As shown below, the input parameter b is converted to UnsafePointer bb in the function block.


var  b : Int32 = 10
let result :Int32 = withUnsafePointer(to: b) { (bb: UnsafePointer<Int32>) -> Int32 in
      var t : Int32 = bb.pointee
      let mt : UnsafeMutablePointer<Int32>? = UnsafeMutablePointer<Int32>(&t)
  
      let m : Int32 = o.sump(mt, add:bb)
      return m
}

after the code block returns, b is still 10.


The similar function can also be called using withUnsafeMutablePointer, which will allow to update b's value if it is updated inside the objective c function as shown below

var  b : Int32 = 10
let result2 = withUnsafeMutablePointer(to: &b) { (bb: UnsafeMutablePointer<Int32>) -> Int32 in
          
    let mt : UnsafePointer<Int32>? = UnsafePointer<Int32>(bb)
  
    let m : Int32 = o.sump(bb, add:mt)
    return m
}

if sump function updates first parameter's value, then after the above code block returns, the variable b's value will be changed to the updated value.


Saturday, November 24, 2018

Manually create swift bridging header file in xcode project

In order to call objectiveC library from swift project, swift project needs a bridging header file to import the ObjectiveC header file, so swift code can get the functions signature defined in objectiveC library.

If swift project is already created when importing ObjectiveC, then you need manually create the bridging header file with the below steps:

1. in swift project, clicking add new file, and add a objective C coca file, for example, adding a default ViewController class
2. Xcode will show a dialog to ask you whether to create a bridging header file
3. Click Create bridging Header button to create the bridging header file
4. Once the bridge header file is created, in the swift project, delete the objective C .h and .m file by moving them to trash
5. In swift project settings general tabs' "linked Framework and Libraries" section, add the Objective C library project
6 update swift project Bridging Header file, to include the objectiveC header file. For example, if the ObjectiveC library is named as "ObjcLibrary", then add the below line

#import <ObjcLibrary/ObjcLibrary.h>


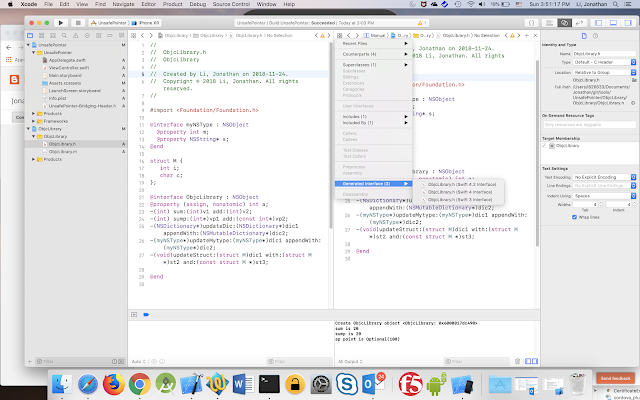
After importing the c .h file into the swift project, quite often you want to check the generated swift function signature based on c .h file. You can do so with the below steps
1. open the c version .h file
2. open the Assistant Editor window, and  then open the same c version .h file in it
3. click "Related items" button, and then select "Generated Interfaces", which will allow you to choose swift version for the generated swift .h file
Now, you can compare the c .h file and the generated swift interface side by side


Sunday, November 18, 2018

Handle ios inAppPurchase auto-renewing subscription without server side receipt validation

Instead of asking user to purchase your app before downloading it, inAppPurchase provides more options to allow user to purchase the app. In order to leverage ios inAppPurchase function, app developers need to integrate ios StoreKit into the application.

Auto renew subscription is a typical case for this purpose if you want to charge users periodically for using your app.

Two modules to be implemented in order to support auto renew inAppPurchase function
1. Get product information
Based on product id defined in app store connection, application can query the product information using SKProductsRequest object. In the didReceiveResponse delegate method, the product information (SKProduct) is available in the returned SKProductsResponse.products. User needs this information for making a purchase.

2. Purchase the subscription
2.1 In order to purchase a subscription, application first creates a SKPayment object based on SKProduct object returned in step 1, then call SKPaymentQueen.default.add(SKPayment:) method to start the purchase

2.2 StoreKit processes the purchase request submitted in SKPaymentQueue, and then inform the application about the purchase status and result in SKPaymentQueue's updatedTransactions method. To do that, application must add a queue observer (implementation of of SKPaymentTransactionObserver protocol) to get payment queue events.
SKPaymentQueue.default().add(self)

When purchased state is reported by updatedTransactions method, it indicates the purchase is finished, and the app should give user the permission to access the resource, and then call finishTransaction to remove the transaction from paymentQueue. Note finishTransaction should also be called even if the transaction failed.

func paymentQueue(_ queue: SKPaymentQueue,

                    updatedTransactions transactions: [SKPaymentTransaction]){
   switch transaction.transactionState {
      case .purchased:
         queue.finishTransaction(transaction)
         //give user permission
     case .restored:
          queue.finishTransaction(transaction)
         //restore the transaction and give user permission
     case .failed:
        queue.finishTransaction(transaction)
        //inform user the purchase failure
      }
    }
}

For auto-renewing subscription, the transaction date and related information can be stored in keychain, so if user deletes the app from device and then installed it again, the purchase record will still be there, so user does not need to restore the purchase record before using the app.

If user purchased the auto renew subscription and then switch to a different phone, then before let user to purchase the subscription, you should allow user to restore the subscription by calling the below method.
   SKPaymentQueue.default().restoreCompletedTransactions()
When the subscription gets restored on the new device, the application paymentQueue:updatedTransaction method will received the stored event. The original transaction is available in the transaction.origin property. The actual transaction date should come from transaction.origin.transactionDate property.

Note when the subscription is auto renewed, the application's paymentQueue:updatedTransaction  queue will be called after the AppStore automatically renew the subscription without user interaction. In this case, the transaction parameter contains the information for the current renew's information The transaction.origin contains the original initial transaction info. So transaction.transactionDate should be used to update the subscription date.

For simple application, it can just compare the current date with the transaction date extended with the subscription period, if the subscription is still within that period, then allow users to use the app. Otherwise, ask user to purchase or restore the subscription.

Choose inapppurchase product type:
1. users can purchase consumable products many times, but can only buy non-consumable project only once. If users try to buy non-consumable project again after previous purchase, iOS SDK will show an message box to user to prevent the purchase.
2. Although user can buy Non-Renewing Subscription more than once, but when user buy it second time, ios SDK will show a dialog saying "You've already purchased this subscription, tap buy to renew or extend it." This may cause confusion to user.
3. Auto-renewable subscription does not have a way for user to easily unsubscribe the product, this may cause concerns to users for using it. Although it is easy for application to handle renew as it automatically renewed by app store, and the application only needs to handle the renew transaction result.

Choose between free trial period and limited function before user buys 
Before users purchase your inapp purchase item, you may want to let users first experience your application. You can do this by either providing a free trial period, or you can limit only partial functions are available for users before they purchase the product.
Comparing with free trial period, it is relative easier to provide limited function for users, for example, you can only allow user to watch a single chapter of a book, or view few minutes of a movie. As with free trial period approach, you have to implement brand new logic in your application to manage the beginning and end of free trial period, and also properly handle the case when user delete and reinstall the app on the device. In addition, some inapppurchase product types may not support free trial period by App Store.

Prompt user for purchase result
When user subscribes an item, after the purchase is finished, iOS SDK will show a message box to user to report the success result. So application does not need to show a message box to report the result to user. However, if user restores an subscription to a device, after the restoring is finished, iOS SDK does not show anything to user, so application should show a message box to tell user the restoring has succeeded.

Saturday, November 17, 2018

Handle ios NSURLSession authentication request

Some notes about ios NSURLSession authentication

1. Session and task delegate
Although NSURLSessionTaskDelegate can be used to handle task specific event, there is no api to allow setting a task delegate for each individual data task when it is created.
Both NSURLSessionDelegate and NSURLSessionTaskDelegate is set when calling NSURLSession
+ (NSURLSession *)sessionWithConfiguration:(NSURLSessionConfiguration *)configuration delegate:(id<NSURLSessionDelegate>)delegate
method. That means the NSURLSessionDelegate and NSURLSessionTaskDelegate must be implemented in the same object if you need to handle both them in your app.

Note, both NSURLSessionDelegate and NSURLSessionTaskDelegate defines the didReceiveChallenge method for application to handle the authentication challenge.

For NSURLAuthenticationMethodServerTrust and NSURLAuthenticationMethodClientCertificate authentication methods, if didReceiveChallenge is implemented in NSURLSessionDelegate, then the session delegate will be called. Otherwise, the didReceiveChallenge method implemented in NSURLSessionTaskDelegate will be called.

For NSURLAuthenticationMethodDefault and NSURLAuthenticationMethodHTTPBasic authentication method, they will only be called on NSURLSessionTaskDelegate's didReceivedChallenge method, and if not implemented there, the request will fail and will not invoke the NSURLSessionDelegate's implementation.


2. Handle NSURLAuthenticationMethodServerTrust authentication
For NSURLAuthenticationMethodServerTrust, if you just want the same bebaviour of how Mobile Safari handles the server trust authentication, then it is better to just let ios default handler to handle it by calling the completionHandler with below parameter

completionHandler(NSURLSessionAuthChallengePerformDefaultHandling, nil)
You only need to implement your customization logic if you want to trust all server cert or implement server certificate pin function.

3. Timeout for user interaction during authentication handling
When handling authentication challenge, you may want to show some UI to allow user interaction, such as trusting self sign server cert for server trust, or picking a client certificate for client certification challenge. 

However, this does not work for NSURLAuthenticationMethodServerTrust and NSURLAuthenticationMethodClientCertificate authentication methods. As for most server, if the authentication challenge's completion block is not called in few seconds, the server will abort the TCP connection, and then the client will get the same challenge again (the previousFailureCount is still 0 for the new challenge). At this moment, even if the app handles the second challenge properly, the original datatask request cannot finish, and the datatask's didCompleteWithError method is never called. So in order to handle the case, if the application gets the second pending request before the first one's completion block is called, the app should cancel the current data request, so the datatask's didCompleteWithError will be called to finish the data request.

As a result, in order to properly handle NSURLAuthenticationMethodServerTrust and NSURLAuthenticationMethodClientCertificate challenge, the application should avoid any user interaction, so that the app can finish the authentication and call the completion block in 1 or 2 seconds.

Note this behavior is different from NSURLAuthenticationMethodHTTPBasic (or NSURLAuthenticationMethodDefault) authentication methods. As for NSURLAuthenticationMethodHTTPBasic challenge, usually user needs to input the username and password, the test shows if the completion block is not called, the server will just wait without automatically aborting the connection, until it is called later.

This issue for not calling the completion block for NSURLAuthenticationMethodServerTrust and NSURLAuthenticationMethodClientCertificate challenge is even more serious for WKWebView's didReceiveAuthenticationChallenge method
- (void)webView:(WKWebView *)webView didReceiveAuthenticationChallenge:(NSURLAuthenticationChallenge *)challenge completionHandler:(void (^)(NSURLSessionAuthChallengeDisposition disposition, NSURLCredential *credential))completionHandler;
If the completionHandler is not called in few seconds, then the app will just crash.

By the way, client certificate mutual authentication for wkwebview is supported in iOS 12.

Thursday, November 8, 2018

Understand cordova channel event handler

Javascript supports common event handling with addEventListener and dispatchEvent methods. The event is defined on a particular object, such as document or window object. This limits the case when different objects want to have a shared event subscription manager.

For this purpose, cordova implemented a channel module to manage the event. Different modules can create their own named events (channels), but those events are handled by a shared cordova channel object.

Modules need to first call the below method to access the shared cordava channel object
  var channel = require('cordova/channel'),

With the channel object, it can call create or createStick method to create a named channel (event).
   var namedChannel = channel.create('myChannel');

The create/createStick method are the only method exposed by channel module, which can be used to create named channel instance, this is similar to the Factory pattern. As all named channel lives in the same shared cordova channel object, be sure the name is unique when creating the named channel.

Although named channel all lives in the shared channel object, they are not visible to external caller, so the module which creates the named channel instance should keep a variable reference to it, usually the channels are saved in a channels dictionary with channel name as key, and channel object as value. The owner of the named channel object then exposes APIs to allow other modules to call the instance method on the namedChannel object to subscribe, unsubscribe, or fire the event on the named channel.

For the document object, cordova.js already created few cordova common events, like onDeviceReady, etc, so other modules can use them to get cordova notification events. However, in this case, caller can directly call the javascript addEventListener method to subscribe a event without going through the cordova channel APIs. The reason is Cordova.js already override the document.addEventListener method, so it checks if the matched event name is created by cordova channel API, then it will be handled by cordova channel module, otherwise, it will be handled by default javascript addEventListener method.

Monday, November 5, 2018

Update and re-sign apk file for android testing

Sometimes you gets an apk file from other developers, and need to update certain web resource files (AndroidManifest.xml, javascript, text, or image files), and then resign it to run some testing on your android device. The following steps can be used to do so.

1. download APKTool based on
https://ibotpeaches.github.io/Apktool/install/

2. Run the below command from terminal to extract origin.apk
apktool d /Users/i826633/Documents/Bugs/496624/origin.apk

3. update the web resource files in the extracted folder

4. run the below command to build the update
apktool b /Users/i826633/Documents/Bugs/496624/origin
this will generate a new apk file in /Users/i826633/Documents/Bugs/496624/origin/dist folder

5. for simplifying, rename generated apk file to updated.apk and copy it out to the same folder as original apk file

6. from terminal run the below command from the folder containing your updated apk file. You may need to update the path based on android studio version
/Users/i826633/Library/Android/sdk/build-tools/28.0.2/zipalign -v -p 4 updated.apk aligned.apk 

7 copy your android sign jks file to the same folder, and then resign the aligned apk with the below command. If you do not yet have a signing jks file, you can use the debug signing file created by android studio. It is under C:\Users\username\.android\debug.keystore, and the password is 'android'
/Users/i826633/Library/Android/sdk/build-tools/28.0.2/apksigner sign --ks debug.keystore--out signed.apk aligned.apk

8. run the below command to verify the signed apk is valid. If anything is wrong, it will report an error
/Users/i826633/Library/Android/sdk/build-tools/28.0.2/apksigner verify signed.apk

9. install the apk to device and run it on your device
adb install signed.apk


As a side note, to reload the webview content in android cordova webview, run the below code from Chrome inspector's javascript debugger
window.location.reload()

Thursday, November 1, 2018

Ignore whitespace when comparing changes from a github commit

Quite often we need to find what is changed in a git commit. The github shows the difference when clicking a commit in commit history. However, any whitespace change in the commit is also shown as difference.

In order to ignore the whitespace change, you can append w=1 in the url and then refresh the page.

Thursday, October 11, 2018

How to select and add iOS UI control to storyboard in xcode 10

Apple has changed the way to find and add UI views and controls to storyboard in XCode 10. In Xcode 9 and older versions, the UI views and controls are available in Inspector area at the right bottom corner.

In XCode 10, A new button (called "library") was added in top right corner, clicking this button shows the regular ui element selecting window, from there, developers can select a UI control,  and then drag and drop it to the storyboard's view controller. After adding the control to the view controller, the library window will close by itself automatically.


Sometimes, you may need to add multiple UI element into the storyboard, in that case, to avoid repeatedly click the toolbar button to open the library window, you can hold the option key when click the library toolbar button. 

Saturday, September 22, 2018

Using WKURLSchemeHandler for wkwebview cross domain requests

One issue to limit ios app to use WKWebView is cross domain requests, basically html file loaded from local file system cannot send requests to remote server, and vice versa, html file loaded from remote server cannot load js files from local file system.

Apple introduced WKURLSchemeHandler in iOS 11 to solve this issue, however, it still has some problem:
1. only custom scheme can be handled by WKURLSchemeHandler, so well-known scheme, such as http, https cannot be registered and handled by WKURLSchemeHandler.

2. in order to let WKURLSchemeHandler to handle xmlhttprequest, the root html file must also be loaded by the same scheme. If the root html is loaded by scheme of file://, http:// or https://, then calling xmlhttprequest from javascript with custom scheme like myscheme:// does not work with the registered WKURLSchemeHandler.

3. Due to item 2, the only option left is always loading the root html file using custom scheme. When the root html file is loaded using custom scheme, such as myscheme://, then the testing shows the <script> element can load javascript file from any remote servers using https:// or http:// scheme. However, when javascript sends xmlhttprequest to a remote server using http:// or https:// scheme, the request will fail due to the cross domain limitation, as from wkwebview's point of view, those requests are from different schemes.

In order to solve the issue 3, one option is, after loading the root html using the custom scheme, then intercepting and override all xmlhttprequests in javascript side. So for all regular schemes, such as file://, https://, http://, always prefix "wk", so they will become wkfile://, wkhttp://, wkhttps://. Finally using WKURLSchemeHandler to register all the custom schemes used by the app, and then in the custom handler, either loading the content from local file system, or from remote server using NSURLSession.

Another option is customizing the web server's response if you have control over it. So that it can set Access-Control-Allow-Origin header in response to allow custom scheme and origin, although I have not verified that in testing. (To be updated later)


Friday, September 21, 2018

NSURLSession may automatically retry the webview request started before app entering background

As decribed in http://www.openradar.me/39508158in ios 11.3 when app enters background, UIWebView will drop the current open connection, and as a result, the connection will get an connection lost error when enters the foreground again.

However the testing shows the behavior is different depending on how the testing is done. A recent testing on ios 11.4.1 device shows, when app enters background, the UIWebView's open xhr connection for a GET request is kept open, so uiwebview in the application does not get the connection close error when entering background or returning to foreground again. 

But, the server response for this original request is ignored somehow, and is not received by UIWebView's xhr request. 

Later, when the application enter foreground again, the fiddler shows NSURLSession automatically clone the original request, and send the new request to server. Once the server response for the new request is received by device, it is sent back to UIWebView's original xhr request for the UIWebView to process. 

So from the application's point of view, the original request is succeeded after the app enters background and returns to foreground again.

This behavior is described at Apple document 
 https://developer.apple.com/library/archive/qa/qa1941/_index.html

Tuesday, September 4, 2018

Working with WKHTTPCookieStore

1. Share the cookie between multiple WKWebView instances
When sharing the cookies between multiple WKWebView instances, all instances need to set to the same WKProcessPool. Without doing this, when calling WKHTTPCookieStore.getCookie method from the second wkwebview instance, the callback completion block will not be called until the webview goes into background.
So setting process pool to the same value for multiple WKWebView instances is really for calling the getCookies' completion block, it is not for using a shared WKHTTPCookieStore object for all the webview instances.

2. observe WKWebView Cookie change events
When adding cookie change observer of WKHTTPCookeStoreObserver to WKHTTPCookieStore, be sure the observer instance is retained by the app before adding it to cookie store, as cookie store does not maintain a strong reference to the observer. As a result, adding the observer to cookie store is not enough, the app must need to retain the observer before is removed from the cookie store.

In addition, when setting multiple wkwebview to use the same process pool instance, somehow the WKHTTPCookieStoreObserver stops working, and could not receive the cookie change events.

3. cookie synchronization change in ios 12
In ios 11, there is a bug to prevent cookie sync between wkhttpcookie store and NShttpcookie store. Basically, after calling setCookie to set the cookie in NSHttpCookie store, it will not update the existing cookie, so wkhttpcookie store cannot synchronize its cookie items to nshttpcookie store. This has been fixed in ios 12, so we can implement the function to keep nshttpcookie store and wkhttpcookie store stay synchronized.

Saturday, August 25, 2018

Understanding iOS NSNotification


iOS notification center delivers notifications to observers synchronously. In other words, when posting a notification, control does not return to the poster until all observers have received and processed the notification. 
To send notifications asynchronously use a notification queue, which is described in Notification Queues.
In a multithreaded application, notifications are always delivered in the thread in which the notification was posted, which may not be the same thread in which an observer registered itself.

This is similar to how javascript addEventListener and dispatchEvent works, so when dispatchEvent is called, the method will not return to caller until all added event listeners returns from their event handler call back methods.
https://developer.mozilla.org/en-US/docs/Web/API/EventTarget/dispatchEvent

Wednesday, August 15, 2018

Utility functions for ios NSUserDefault

1. Dump all items in NSUserDefault


NSArray *keys = [[[NSUserDefaults standardUserDefaults] dictionaryRepresentation] allKeys];

for(NSString* key in keys){
        NSLog(@"%@ : %@",key, [[NSUserDefaults standardUserDefaults] valueForKey:key]);
}


2. Observe changes in NSUserDefault


- (BOOL)application:(UIApplication*)application didFinishLaunchingWithOptions:(NSDictionary*)launchOptions
{
  [[NSUserDefaults standardUserDefaults] addObserver:self
                                            forKeyPath:@"mykey"
                                               options:NSKeyValueObservingOptionNew
                                               context:NULL];

    self.viewController = [[MainViewController alloc] init];
    return [super application:application didFinishLaunchingWithOptions:launchOptions];
}

- (void)observeValueForKeyPath:(NSString *) keyPath ofObject:(id) object change:(NSDictionary *) change context:(void *) context
{
    if([keyPath isEqual:@"mykey"])
    {
       NSLog(@"SomeKey change: %@", change);
    }
}

3. Settings bundle with NSUserDefault
Application can use ios Settings app to allow user to configure settings. However, settings put into Settings.bundle root.plist will not be automatically picked up when app reads settings from NSUserDefault. The settings only apply to NSUserDefault after user change the value from settings app.
So if user has not change a setting from ios setting app, read the key from nsuserdefault will return nil, which means the key does not exist in NSUserDefault.
One way to overcome this issue is calling NSUserDefault regsiterDefault method, this will set the initial values in NSUserDefault for all the keys in NSDictionary parameter. 

Friday, August 3, 2018

How to revert from iOS 12 beta to iOS 11

Recently a device was upgraded to 12 beta for testing, but as the device was previously used by other developers, so there is no backup available for restoring the device to ios 11.

Tried few things mentioned in web, but unfortunately none of them works.

Finally, find a simple way to do so, by just deleting the ios 12 beta installation profile from device settings app at Settings->general->Profile & Device Management, restore the device using iTune. It will restore the device to a new ios 11.4.1 setup.

Monday, July 16, 2018

Convert iOS app bundle (.app file) to ipa file

When xcode builds a project, it generates an app bundle as output. In order to install the app bundle to iOS device, the app bundle file needs to be converted to a ipa file.

The following steps can be used to convert app bundle to ipa file
1. Create a folder named as "Payload"
2. drag and drop the app bundle file (myapp.app file) into Payload folder. You can get the .app file from xcode derived folder
3. Compress the payload folder to a zip file
4. Rename the zip file to ipa file


Saturday, July 7, 2018

Understanding SAP UI5 view navigation and routing

SAP UI5 application manifest.json file defines targets and routes to manage page (view) navigation.

Usually, there is a root xml view, which does not contain any UI content, its only purpose is define an App id for holding other xml views

Root.view.xml

<mvc:View xmlns:core="sap.ui.core" xmlns:mvc="sap.ui.core.mvc" xmlns="sap.m" controllerName="ui5.test.ui5.controller.Root"
xmlns:html="http://www.w3.org/1999/xhtml">
<App id ="root">
<pages/>
</App>
</mvc:View>  

The real UI are defined in several xml views. For example, an app may define three views
MainView.view.xml
SecondView.view.xml
ThirdView.view.xml

For each view, a target should be defined, which has below properties:
name:
target name is used by route to identify a unique target.
viewName:
indicates when this target is selected, which view will be displayed.

Then for each navigation operation, a route should be defined. Route name is used by navTo method to navigate the application to different xml view.

Route has the below properies
name:
unique name.
Target:
The target to show for the route.
Pattern:
the matched url pattern for selecting a particular route. The first pattern should be empty, so the route will be used to load the default xml view if not url available to select a particular route. Pattern can also include parameter, which can be set and got by view controller.

In view controller, javascript code can call navTo on router object to load a particular route based on name. For example: the below code load "ThirdViewTarget"
onShowThirdView: function (oEvent) {
//This code was generated by the layout editor.
var oRouter = sap.ui.core.UIComponent.getRouterFor(this);
oRouter.navTo("ThirdViewTarget");
},

navTo method can also include parameter for passing context information to the target view as below
onListItemPressed: function (evt) {
 
// Get Property of the Clicked Item. i.e. PO number of the item which was clicked
var selectPO = evt.getSource().getBindingContext().getProperty("ProductID");
 
// Now Get the Router Info
var oRouter = sap.ui.core.UIComponent.getRouterFor(this);
 
// Tell the Router to Navigate To Route_PODetail which is linked to V_PODetail view
oRouter.navTo("SecondTarget", { ProductID: selectPO});
}


The sample manifest.json is attached below:
{
"_version": "1.8.0",
"sap.app": {
"id": "ui5.test.ui5",
"type": "application",
"i18n": "i18n/i18n.properties",
"applicationVersion": {
"version": "1.0.0"
},
"title": "{{appTitle}}",
"description": "{{appDescription}}",
"sourceTemplate": {
"id": "servicecatalog.connectivityComponentForManifest",
"version": "0.0.0"
},
"dataSources": {
"Northwind.svc": {
"uri": "/John/NorthwindDest/v2/Northwind/Northwind.svc/",
"type": "OData",
"settings": {
"odataVersion": "2.0",
"localUri": "localService/metadata.xml"
}
}
}
},
"sap.ui": {
"technology": "UI5",
"icons": {
"icon": "",
"favIcon": "",
"phone": "",
"phone@2": "",
"tablet": "",
"tablet@2": ""
},
"deviceTypes": {
"desktop": true,
"tablet": true,
"phone": true
},
"supportedThemes": ["sap_hcb", "sap_belize"]
},
"sap.ui5": {
"rootView": {
"viewName": "ui5.test.ui5.view.Root",
"type": "XML"
},
"dependencies": {
"minUI5Version": "1.30.0",
"libs": {
"sap.ui.layout": {},
"sap.ui.core": {},
"sap.m": {}
}
},
"contentDensities": {
"compact": true,
"cozy": true
},
"models": {
"i18n": {
"type": "sap.ui.model.resource.ResourceModel",
"settings": {
"bundleName": "ui5.test.ui5.i18n.i18n"
}
},
"": {
"uri": "/John/NorthwindDest/v2/Northwind/Northwind.svc/",
"type": "sap.ui.model.odata.v2.ODataModel",
"settings": {
"defaultOperationMode": "Server",
"defaultBindingMode": "OneWay",
"defaultCountMode": "Request"
},
"dataSource": "Northwind.svc",
"preload": true
}
},
"resources": {
"css": [{
"uri": "css/style.css"
}]
},
"routing": {
"config": {
"routerClass": "sap.m.routing.Router",
"viewType": "XML",
"async": true,
"viewPath": "ui5.test.ui5.view",
"controlAggregation": "pages",
"controlId": "root",
"clearControlAggregation": false,
"viewLevel": 0,
"bypassed": {
"target": []
}
},
"routes": [{
"name": "MainTarget",
"pattern": "",
"titleTarget": "",
"greedy": false,
"target": ["MainTarget"]
}, {
"name": "SecondTarget",
"pattern": "second/{ProductID}",
"titleTarget": "",
"greedy": false,
"target": ["SecondTarget"]
}, {
"name": "ThirdViewTarget",
"pattern": "third",
"titleTarget": "",
"greedy": false,
"target": ["ThirdViewTarget"]
}],
"targets": {
"SecondTarget": {
"viewType": "XML",
"transition": "slide",
"clearControlAggregation": true,
"viewName": "SecondView",
"viewLevel": 2,
"routerClass": "sap.m.routing.Router",
"async": true,
"viewPath": "ui5.test.ui5.view",
"controlAggregation": "pages",
"controlId": "root",
"bypassed": {
"target": []
}
},
"MainTarget": {
"viewType": "XML",
"transition": "slide",
"clearControlAggregation": true,
"viewName": "MainView",
"viewLevel": 1,
"routerClass": "sap.m.routing.Router",
"async": true,
"viewPath": "ui5.test.ui5.view",
"controlAggregation": "pages",
"controlId": "root",
"bypassed": {
"target": []
}
},
"ThirdViewTarget": {
"viewType": "XML",
"transition": "slide",
"clearControlAggregation": true,
"viewName": "ThirdView",
"viewLevel": 2
}
}
}
}
}

Friday, May 25, 2018

Download IPA file from Apple app store

Sometimes it is important to download an ipa file from iOS app store to examine the app resource and configuration, or re-sign the ipa file for testing purpose.

The following steps can be used to do so

1. install Apple Configurator 2 on your mac.
2. From Top menu bar, select Account and add your AppID account
3. Connect your ios device
4. In the current window, click "add" button and select the app you want to download
5. When the dialog asks you about "Would you like to replace it with the one you are adding", from Finder, goto the below folder and search for the ipa file just downloaded. Copy the ipa file to a different folder for you to use, then click the stop button

~/Library/Group\ Containers/K36BKF7T3D.group.com.apple.configurator/Library/Caches/Assets/TemporaryItems/MobileApps


Thursday, May 24, 2018

Share encrypted data between ios and android clients

It is a common use case to use password to encrypt sensitive data in mobile applications. The basic logic is first deriving an encryption key based on password, and then use the password to encrypt the sensitive data.

The question is when using the same algorithm and password on both ios and android client,
1. Would both clients generate the same encryption key?
2. If so, could data encrypted from one client be decrypted by another client?

Question 1: Encryption key generation

For this testing, key generation is implemented using PBKDF2.

For iOS client (iOS 11.3 on iphone 7) , CCKeyDerivationPBKDF method can be used for this purpose. For testing purpose, the password is hardcoded as "password", and the salt is hardcoded as "salt", and the hash algorithm is KCCPRFHmacAlgSHA512,  the round is set to 100. Note the derived keysize should match the selected algorithm, there is no point to use KCCPRFHmacAlgSHA512 to generate an 32 bytes key (256 bit), as the total result hash is limited to 32 byte instead of 64 byte. Actually in iOS, if the keysize is smaller than the algorithm generated keysize, the generated key will be truncated to the specified keysize.

        var password = "password"
        var salt = "salt"
        var derivedKey : NSMutableData = NSMutableData(length: kCCKeySizeAES256)!
        var passwordData = NSString(string: password).utf8String
        var passwordDataSize = password.utf8.count
        var saltData = NSString(string: salt).utf8String
        var saltDataSize = salt.utf8.count
        var saltDataPointer = UnsafeRawPointer(saltData!).bindMemory(to:UInt8.self, capacity:saltDataSize)

        CCKeyDerivationPBKDF(CCPBKDFAlgorithm(kCCPBKDF2), passwordData,
                             passwordDataSize, saltDataPointer, saltDataSize,
                             CCPseudoRandomAlgorithm(kCCPRFHmacAlgSHA256),
                             uint(100),
                             UnsafeMutablePointer<UInt8>         (derivedKey.mutableBytes.assumingMemoryBound(to:UInt8.self)),
                             derivedKey.length)

For Android client, to match the iOS side configuration, SecretKeyFactory is used with the algorithm of PBKDF2withHmacSHA512. Note this algorithm is only supported on Android API 26 (Android 8.0) and above. The testing is done on Samsung S9 device.

SecretKeyFactory provider = SecretKeyFactory.getInstance("PBKDF2withHmacSHA256");
String password = "password";
String salt = "salt";
char[] passwordData = password.toCharArray();
byte[] saltData = salt.getBytes("UTF8");
KeySpec keySpec = new PBEKeySpec(passwordData, saltData, 100, 256);
SecretKey key = provider.generateSecret(keySpec);
byte[] keydata = key.getEncoded();

The test shows both ios and android client generate the same encryption key as showing below in hex format, so this confirms the ios and android clients can derive the same encryption key using the same password and algorithm.

"07e6997180cf7f12904f04100d405d34888fdf62af6d506a0ecc23b196fe99d8"


Question 2: Data encryption

Now that we know that the same key can be generated by ios and android client based on the same password, the second steps is checking whether data encrypted by one client can be decrypted by another client using the same encryption key.

The IV is set to a 16 byte array of 0.  The data is a simple string of "this is a testing string".

On ios the encrypt method is using CCCrypte

        var outLength : size_t = 0;
        let cipherData : NSMutableData? = NSMutableData(length: dataToEncrypt.count + kCCBlockSizeAES128);
        let ivb : [UInt8] = [0,0,0,0,0,0,0,0,0,0,0,0,0,0,0,0]
        let iv = NSData(bytes: ivb, length: 16)
        let result = CCCrypt(            UInt32(kCCEncrypt), // operation
            UInt32(kCCAlgorithmAES128), // algorithm
            UInt32(kCCOptionPKCS7Padding), // options
            (encryptionKey as NSData).bytes, // key
            encryptionKey.count, // keylength
            iv.bytes, // iv
            (dataToEncrypt as NSData).bytes, // dataIn
            dataToEncrypt.count, // dataInLength,
            UnsafeMutablePointer<UInt8>(cipherData!.mutableBytes.assumingMemoryBound(to:UInt8.self)), // dataOut
            cipherData!.length, // dataOutAvailable
            &outLength); // dataOutMoved


On Android client, Cipher is used to encrypt data as below

byte[] dataByteToEncrypt = dataToEncrypt.getBytes("UTF8");
Cipher dataCipher = Cipher.getInstance("AES/CBC/PKCS5Padding");
dataCipher.init(Cipher.ENCRYPT_MODE, key, iv );
byte[] encrypedData = dataCipher.doFinal(dataByteToEncrypt);

On both client platform, the encryption generates the same output byte array of
"92a78f657da19a444e28c83f604a63401dc9a81300dcf4b2707fe66a9d62f158"ta 

Conclusion:
The testing result indicates when the same algorithm, salt, iv and password are used, the data encrypted in one platform can be decrypted in another platform, so there is no need to use external third party library to handle data encryption/decryption when the encrypted data need to be transferred between android and ios clients.